As promised the detailed connector info of C1 and C2
I also have a .pdf (with 5MB too big to upload here) with all the connector pin descriptions. If anyone needs this just let me know I can email it.
Harald


As promised the detailed connector info of C1 and C2
I also have a .pdf (with 5MB too big to upload here) with all the connector pin descriptions. If anyone needs this just let me know I can email it.
Harald
If nobody has done it before, somebody has to do it....
1997 Tahoe 2dr 4WD
2002 Alfa Romeo Sportswagon 2.0 JTD
1982 Deutz Intrac 2004A
2003 friesian Horse " Henry"

The E38 connectors are Delphi.
the two E38 have the following part No: (sorry the T42 connector is also listed..)
Part Number, Description,
13511426 "80 Way Gray 0.64 Sealed Female Connector Assembly",
15463921 "49 Way Black GT 280 Micro 64 Sealed Female Connector Assembly"
15499466 "73 Way Black 0.64 2.8 Sealed Female Connector Assembly"
the different pins are:
quote above:
Hey guys, all of the information that I have found was that the E38 ecm connectors were made by MOLEX? When you did your E38, did you actually use DELPHI connectors?
Just one guy tryin' to make a difference
just copy the connector part No and paste them in the search box on the Delphi webpage... you will see the correct E38 connectors.
Harald
If nobody has done it before, somebody has to do it....
1997 Tahoe 2dr 4WD
2002 Alfa Romeo Sportswagon 2.0 JTD
1982 Deutz Intrac 2004A
2003 friesian Horse " Henry"

Check this thread out for E38 connector views & pinouts....http://forum.efilive.com/showthread.php?t=11845
2008 2WD Ext.Cab Silverado 1500 6.0 V-MAX E38(L76) & T42(4L70E) MAF Only CL Corvette Servo AFE CAI INNOVATIVE LM-2 WBO2
FLASHSCAN V2 & AUTOCAL
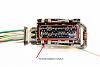
A few pics to show how the wire/terminal is added to the E38 body connector:
Body or J1/X1 Connector for E38 ECM. It is the 73 pin connector. Note the arrow to cavity 5. Most unused cavities have either a blue plug or a black plug that is molded as part of the connector. Cavity 5 has the molded in plug. The cavity is blocked with this plug.
E38/E67 .64 Series Terminal with wire
Flipside of connector - terminal side where it plugs in to ECM socket.
Small screwdriver is used to break the black molded in plug loose. Push on the edge of the plug alongside the cavity wall for best leverage. It should break loose without too much pressure if you push in the right place.
If your connector has the molded in black plugs, they need to be removed from the terminal area underneath the terminal seperator. Use a small screwdriver at each end of the seperator to leverage it out. Cable end:

Last edited by gmh308; November 27th, 2009 at 11:50 PM.
Continued:
Leveraging the other end to the cable side out. The seperator needs a light push upward to unclip it at each end.
Terminal side view.
Look into cavity 5 for the molded in plug and remove it with a small tool. Though some connectors may have no plugs, and open seals, this is unlikely.
Terminal on the way in to the right cavity. Make sure it is oriented the right way around. There is an open section in the terminal which needs to engage a locking tang once pushed in.
Terminal all the way home on the connector side. Note a "click" when it is in the right place as the tang clicks in to the terminal.
Last edited by gmh308; November 28th, 2009 at 12:14 AM.
Connector with terminal seperator re-installed. Only goes one way, with different sized tongues on each end, and the ground terminal.
E67 uses same connectors, but they only plug into an E67. Process is the same.
If you are in the land downunder, and cant find any E38/E67 terminals, we have single wires with terminals crimped on. PM me.
Trust this helps y'all.
Very insteresting update ! I wish all that info was available when I
was messing with that 07 Escalade to run on E85 about 2 years ago.
2005 RCSB 2500HD GMC Sierra DURAMAX LLY
1955 Chevy Truck 1st series, being restored
2002 Mercedes C270 CDI
Thats a cool step by step..
2008 2WD Ext.Cab Silverado 1500 6.0 V-MAX E38(L76) & T42(4L70E) MAF Only CL Corvette Servo AFE CAI INNOVATIVE LM-2 WBO2
FLASHSCAN V2 & AUTOCAL

Nice job!
Howard
www.redline-motorsports.net
1-954-703-5560
2006 ZO6 895/866 with APS TT
2010 SSRS Camaro HTR-900TT (798/801)
2011 HTR-850R Camaro
2012 ZL1 Auto (10.33@135 MPH) Video Here!
 Posting Permissions

 Reply With Quote